Tuesday, February 28, 2012

Rice Krispie Treat Kisses


Daddy was having a rough day at work, so we decided to make him kisses!  Kisses out of Rice Krispie Treats!  I found this here on Pinterest.  Just use a funnel to make the shape.  We also wrote messages on some tissue paper to put inside the foil just like real kisses.  Although I double wrapped them because I wasn’t sure if the paper would stick to the rice krispie treats.  I think he’ll love them!  Serenity (age 3.5) was a big help with measuring and pouring ingredients and writing the messages!


Monday, February 27, 2012

Instructions for Child’s Toolbelt

***I'm doing my first giveaway!  See below for details!!
Instructions for Child’s Toolbelt

This project was so easy and fun!  I bought a nice heavy brown fabric, not quite as stiff as canvas or duck cloth, but very sturdy because I thought it would be more realistic.  I used cotton web belting in bright colors for the belt and the loops.  Then all I needed was a little bit of Velcro to attach it! 

I made three pockets, each a little different. 

For the middle pocket, cut fabric 9 inches by 4.5 inches.  I hemmed one short side and folded it and hemmed again so no raw edges showed.  Then I folded it up 3 ¼ inches, right sides together, and sewed up the sides.  Then I did a pinch hem like I did on the mailbags here, to give this pocket a little dimension.  This one was just ½ inch from the point.  Then I turned under the raw edges  on the sides above the pocket and sewed those so no raw edges showed.  Then I folded the top back and hemmed that.  Then I sewed it to the middle cotton belting (which I cut to 30 inches).  I put it in the middle of the belt from the top and the bottom too, because I wanted a bit of the color to show above the pockets on the belt.  This pocket was sized for the measuring tape from our play toolkit, or a very small real one eventually. 

The left pocket (as you’re facing the belt) has the loop for a hammer.  This is just six inches of the web belting sewn into the hem on the left side of the pocket.  This pocket was cut 15 inches by 5.5 inches.  No pinch hem on this one, just hem one short side, fold it up 6 inches (right sides together) and sew the sides up.  With the loop for the hammer in one side.  Then roll over the raw sides above the pocket and hem.  Then hem the top.  I tried to make the top the same on all three pockets so the opening of all three pockets is in a straight side.  So just fold it as much as it needs to be to match the first one. 

The last pocket begins the same as the hammer pocket.  Double hem the short side, then we sew on the embellishments.  I made a little pleated pocket by cutting a 4.5 inch square.  Then I hemmed it all around.  Then I made a pleat so the pocket ends up being just three inches, and it has some nice dimension so it can hold pliers or play nails or whatever.  Then stitch it to the front of the pocket.  Then cut a little strip of belting, 2.5 inches long.  I fold under the edges and stitch it to the pocket, making sure it wouldn’t fall into the seam.  This means it sticks out a little bit so it’s easy to stick a screwdriver in. 

Finish that pocket like the hammer pocket, fold it up seven inches, hem the sides, fold right side out and hem the sides above the pocket.  Hem the top, then attach it to the belt! 

Just add some Velcro and you’re done!  I hope this tutorial is clear enough, it’s really very easy and forgiving.  Any kind of pockets will work great!  =)  
Serenity wanted her tool belt to be pink =)


Turns out it's also a handy place to carry your magic wand =)

These are so much fun to make I'm going to make an extra to give to one of my followers!  Just leave a comment below saying you're following me or subscribed to my rss feed!  I'll choose someone at random next Monday!  Oh, and pick a color for the belt =)  

Tuesday, February 21, 2012

Sneak Peek: Child's Toolbelt

I just managed to get this project to this point, and I couldn't wait to show you!  Hopefully I'll have time to write up the pattern and tutorial for the weekend post =)  So for today I'll just post the picture! 

Wednesday, February 15, 2012

Silhouette…


Silhouette…

My Silhouette is great… in theory.  I see so many wonderful things people have made on the web, and they always look amazing!  Well, when I tried to use it to make the vinyl letters for my ValentineMailbags… so many things went wrong!  It seems like I need a book or a lot more tutorials on how to use the thing.  So I thought I’d share a little bit that I learned from this particular episode. 

Cutting the vinyl:  I was using the vinyl on a roll.  I made basically one sheet full of the letters “mail” that filled the box on the screen.  I needed three and a half of those though, so I cut one sheet of letters, then cut the vinyl and fed it through to make another set.  BIG mistake!  I should have left the roll long until cutting the last sheet.  The vinyl was too short on the last set I cut and it twisted, ruining the last three sets of letters.  Fortunately, I had just enough to make one for everyone in the class, but I have three bags sitting here blank!  I’ll have to get more vinyl.

Ironing it on: I tried following the instructions on the box, it didn’t WORK!  I was completely baffled.  I would push the iron down on the vinyl very hard for a minute, and then try to peel off the plastic.  It kept sticking, so I’d try to iron it a little more, and it never seemed to help!  I’d pull at the plastic, and the vinyl would stretch and come loose, or I’d have to pick the plastic off bit by bit, also damaging the vinyl.  The fabric I was using was just a heavy cotton canvas, which I suppose could have been part of the problem.  The mystifying part was, occasionally it would peel right off with no problem! 

SO, what finally worked the best was leaving my iron on half of the word “mail”, and continuing to iron as I peeled.  I would pull up the plastic and as it uncovered a letter I’d move the iron slightly.  That worked perfectly, although I was at risk for burning myself on the iron.  But I went from taking ten minutes per bag to a minute and a half per bag, so I was happy at last. =)

I’m still having troubles programming the cutter, so if I figure anything out on that score I’ll share!  If anyone has any tips or tutorials about using the Silhouette I’d love to see them, I still feel lost!!

Tuesday, February 14, 2012

Valentine Presents: Photo Albums


Technically these were supposed to be stocking stuffers… two months late isn’t so bad right? =)  I got these little photo albums from Target and printed some of my favorite pictures from the year to fill them.  I ended up printing more than a hundred pictures when I only needed 72, but it was hard to narrow them down that much!  I have one for each of my children, so they can easily enjoy looking at our pictures.  I’m so behind on scrapbooking I really wanted to do something!  Serenity loves seeing pictures of us when they’re on our website, I thought she’d love this. =)  A quick, easy, and sugar-free Valentine for them. =)  We got PLENTY of candy from class Valentines =)  


Sunday, February 12, 2012

Valentine Post Office Party!


Valentine Post Office Party!

When I was trying to plan Serenity’s class party, I asked her what made her most excited about Valentine’s day.  I really had no idea what she thought about Valentine’s Day, since we’ve only ever done a few heart related crafts in the past, and she has a book or two about it.  She told me she was excited to deliver lots of Valentines to her class!!  So I decided the theme of the class party should be Post Office!


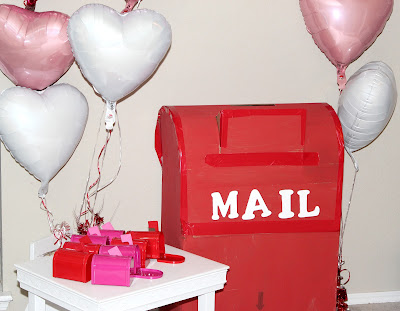
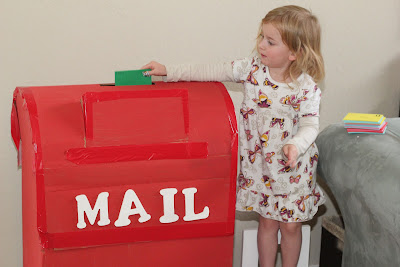
The party was a success!  All the kids in Serenity’s class seemed to have a blast pretending to deliver mail.  We kept recycling the letters so they got to deliver them over and over during the party.  I made the huge mailbox out of cardboard.  I had the big box and red paint on hand.  It has a slot in the top, a door in the back to get the mail out, and the drawer at the front that opens just like a real mailbox.  To make the curved top, I just creased the cardboard at regular intervals by folding over a yardstick.  We also added white wooden letters that spell mail.  If we keep playing with it at home, I may add a key slot for the door at the back. 


The pretend mail was one of the kids favorite part!  Each child had three pieces of mail to start with.  One was addressed to a classmate, one to a teacher, and one to a generic family member like Mama or Daddy.  For the teachers, I actually wrote out the address of the school for each one.  That way if they take it home and play more they can learn about addresses, zip codes, and so on.  I made lots of postcards using craft foam, and then addressed a few envelopes as well.  I put a few dozen pieces of extra mail in the mailbox to get them started too.  We kept recycling the letters throughout the party, and the kids were happy to deliver them over and over!!!


Each child also had a mailbag.  To see how I made them, check out thispost.  Basically I used some canvas to make a little messenger bag with a red grosgrain ribbon strap and wrote “mail” on the side with Silhouette vinyl.  Oh, I still need to write about the joy of using my Silhouette.  I know it can be awesome…I just seem to need a Silhouette for Dummies instruction manual.  I managed to get 24 of these finished in time for the party though, and so I’m content for now =) 


I found the perfect little tin mailboxes in the Target dollar spot, and had one for each child to decorate with stickers.  We wrote their names on labels, which turned out to be a great idea, as they kept getting lost.  Turns out a class party for three year olds is a bit chaotic.  =) 

We also decorated cupcakes and the other parents in my class brought other snacks and treats!  It was so much fun!  I’m on a party high right now, I so want to plan another!!!  If anyone needs help brainstorming for a party, leave a comment and let me know!  I’d love to help. =)  

As far as decorations, we couldn't decorate before the party because it would be too distracting to the students.  So I kept that simple and just picked up balloons from the Dollar Tree.  They had heart balloons in four different colors so you could get a neat ombre effect.  The kids all went ooooh when Eric walked in the classroom with them. =)  The dollar tree lady was very helpful loading them up.  She tied them to balloon weights very short in groups of six, so I was able to carry them in two regular grocery sacks and fit half in my trunk, half in the floorboards.  I could even see out, which was a neat trick!  I was worried about driving those across town in my little Honda but it was fine! =)  

Thursday, February 9, 2012

Mail Bags for Valentine Post Office Party


The Mail Bags for the Valentine Party are done!!  Just in time as the party is tomorrow.  Serenity loves hers!  I’ll have to make sure it gets back in the pile with the rest.

The bags are SUPER simple.  I just cut a rectangle 26 by 12.5 out of some canvas.  I happened to have some of that on hand, and I thought the thick texture would be realistic for a bag like that.  Then I hemmed one short side.  Next, I folded up that side eight inches and sewed the sides of the bag.  Then I did a “pinch” where you open up the bottom so it looks like a triangle on each side and sew perpendicular to the hem.  Here’s a pic of that, I hope it makes it a little clearer, or you can Google it just like I did =) 
the pinch bottom to give it dimension

fold up eight inches

After that, I hemmed the rest of it, just a quick single fold on these.  Then I added a strap.  The strap is cut to 32 inches, so it can be worn on the shoulder or across the body.  At least a 3 year old can. =)  The strap is just grograin ribbon.  I’d planned on twill tape or that heavier strap but they didn’t have enough in red, and I just had to have red straps.  This was cheaper and works just fine! 

My last step was to use my Silhouette Vinyl to iron on the letters… more on that later today if I get time.  I have not yet found the words to describe my recent Silhouette experience.  At least not ones that aren’t four letters.  My Silhouette and I have issues.  We’re working on them. 

One very happy Mailman! 


She helped me make play mail to go inside.  I addressed postcards made of foam to the students, teachers, and some generic ones to Mama’s and Daddys.  Then I got envelopes and addressed them to each student, putting a contruction paper heart, a few stickers inside.  Serenity added a sticker as a stamp to each one.  Each mailbag is loaded with three pieces of mail, and there are lots of extras in the big mailbox.  I don’t imagine they will all get delivered, but hopefully it will be good for plenty of fun!

Tuesday, February 7, 2012

Class Valentine Idea

We just delivered Serenity's class Valentines!  I thought it would be fun to make our own, and when I asked Serenity she wanted to make a picture for her classmates.  I didn't think,however, that she would be willing to sit and make all 24 that we needed individually. =)  So we made one picture, and then I scanned it into Photoshop and printed four to a page.

Then we taped a Smarties to each one.  They had already decorated their Valentine bags so when we got to school this morning we put one in each bag.  Serenity really wanted to put one in her own bag... so I'm not sure we quite get the idea behind this yet.  Ah well, lots more Valentine's Days to come. =) 


Here are pictures of the files I actually printed.  I made them a basic 4inch by 5inch square, and then trimmed the edges and cut them apart, printing on both sides of course. 
She wrote her own name!  I was so proud =)  Although looking at it now I hope her classmates or their parents can figure out who it's from ;) 


The turtle was made using all green hearts =)  We had tried this project a while ago when we checked out the My Heart is Like a Zoo book, but this time she was actually able to place and glue herself.  Then she colored grass for the turtle to eat, and some flowers, and some other things I can't identify.  I love how much her artwork is evolving!  It's fun to watch!!!

Thursday, February 2, 2012

Moose Head =)


My nephew Casey is turning ten this year!  It’s insane =)  He’s such a fun, awesome kid.  They recently moved to a new house so he got to decorate a room just the way he wanted it.  It looks like it came directly out of the Pottery Barn catalog, he has good taste =) He loved this moose head, but since Pottery Barn prices are a little scary, I offered to make it for them. 

Here’s the inspiration…


And here’s how mine turned out!  We haven’t figured out yet how we’re hanging it, we’ll have to figure it out after I get it to their house.  My dad cut out a basic moose head shape with his jigsaw.  This took a LONG time because of all the curves, but he did a fantastic job!  Then my job was to sand, stain, and seal it. 

Then Dad took it back and attached little boards all around the back.  He had drilled holes through these boards so he could wire an LED rope light all around the moose.  I love how it turns out, I can’t wait to see Casey’s face!!!